How to Pair Steam, Speed, and Wall Ovens (Your 2026 Ultimate Guide)

Steam, speed, and wall ovens have become essential components in modern, high-performance kitchens. Rather than relying on a single appliance to do everything, homeowners are increasingly combining specialized ovens to create a more efficient and versatile cooking setup tailored to how they actually cook.
At the center of this approach is flexibility in how these appliances are paired and installed. While vertical stacks are one of the most popular configurations, they are not the only option. Depending on your kitchen layout, you might group ovens in a horizontal bank, integrate them into a larger appliance wall, or mix them across different zones. The goal is the same: to create a cohesive system where each appliance serves a distinct role.
A speed oven handles quick meals and reheating, a steam oven offers precise moisture control for healthier cooking, and a full-size wall oven anchors the kitchen with capacity for roasting and baking. When combined thoughtfully, these appliances allow you to cook multiple dishes at once with better results and less effort.
That said, pairing these ovens successfully requires more than just choosing the right models. Layout, ergonomics, visual consistency, and installation planning all play a critical role in how well the system functions day to day. Whether you are designing a vertical stack or exploring alternative configurations, the right approach will elevate both the performance and design of your kitchen.
Best Vertical Stack Order for Steam, Speed, and Wall Ovens
Recommended Top to Bottom Configuration
When building a vertical oven stack, the order of each appliance matters more than most people expect. A well-planned configuration improves comfort, safety, and overall cooking efficiency.
Top: Steam oven or speed oven
These smaller, lighter units are best placed at eye level, making it easy to monitor cooking progress and access controls without bending or reaching.
Middle: Wall oven
The primary oven should sit in the most ergonomic position, typically centered around waist level. This allows for safer handling of heavy cookware and better control when loading or unloading dishes.


Bottom: Warming drawer or base support
Drawers naturally belong at the base of the stack. They also act as a functional foundation, keeping finished dishes warm or serving as a subtle pedestal for the appliances above.


Why This Order Works
This configuration is not just a design preference. It is based on how people actually cook and interact with their appliances.
-
Weight distribution and safety
Heavier units are positioned lower to reduce strain and minimize the risk of lifting hot, heavy items from awkward heights. -
Frequency of use
The main wall oven sits in the most accessible position since it is used most often, while secondary ovens are placed slightly higher. -
Ease of monitoring and access
Keeping smaller ovens at eye level allows you to check progress, adjust settings, and manage cooking without interrupting your workflow.
Ergonomic Guidelines for Oven Stack Placement
To ensure safety and ease of use, vertical oven stacks must be positioned according to the primary user's physical dimensions. Proper ergonomics prevent back strain, reduce the risk of burns, and ensure stability when moving heavy cookware.
Ideal Height Ranges
Proper appliance height is essential for comfort, safety, and ease of use. Positioning should align with the user’s natural reach to avoid excessive bending, lifting, or strain during everyday cooking.
-
Define the “Good Zone”
The ideal placement range falls between hip level and shoulder height, where access feels natural and controlled. -
Prioritize Waist-Level Placement
The main oven should be centered around waist height. This position provides the best leverage when handling heavy cookware and allows for stable, controlled movement when loading or unloading dishes. -
Keep Controls at Eye Level
Controls and displays should sit near eye level whenever possible, making it easier to monitor cooking progress and adjust settings without disrupting your workflow.

Image Credit: Pinterest
Safe Lifting and Access
Proper positioning is a critical safety measure to prevent injuries during the transition of hot food from the oven to a landing area.
- Utilizing Telescopic Racks: To minimize the need to lift hot, heavy dishes, use telescopic or full-access racks. These racks glide out smoothly, allowing the user to baste, stir, or check doneness while the dish remains supported by the oven.
- Avoiding Overhead Strain: Installing a combi-steam or speed oven too high can be hazardous; having the bottom of a unit at shoulder height is considered potentially dangerous when handling hot liquids or steam.
- Thermal Considerations: When units are stacked high, users should be aware that heat escaping from the vents of the upper unit can be uncomfortable or cause minor burns if it is too close to the user's face.
- Landing Areas: For maximum safety during the lifting process, ensure there is a landing area (at least 40 cm of workspace) near the oven stack for placing hot trays immediately after removal.
Cabinet and Structural Requirements for Oven Configurations
Whether you are planning an all-in-one unit, a separate appliance stack, a triple vertical stack, or a cube layout, proper cabinet structure and technical planning are essential. Each configuration places different demands on support, spacing, and installation, but the core principles remain the same.
Load-Bearing Support and Shelving
-
Use dedicated support for each appliance
Every unit should sit on a solid, load-bearing platform. This is especially critical for separate stacks, triple stacks, and cube layouts where multiple appliances are installed within the same cabinet system. -
Avoid standard adjustable shelving
Lightweight or adjustable shelves are not designed to handle the weight of built-in ovens. Reinforced, fixed supports are required for long-term stability. -
Understand configuration differences
All-in-one units simplify this requirement by using a single cutout and shared support, while separate and stacked configurations require individual platforms for each appliance.
Cutout Dimensions and Depth
-
Plan for adequate cabinet depth
A minimum depth of around 23 inches is typically required, though deeper cabinets may be needed for flush installations or when combining multiple appliances. -
Allow space for wiring and plumbing
Electrical conduit, water lines for plumbed steam ovens, and ventilation clearances must be accounted for. Without this space, appliances may not sit flush or install properly. -
Account for layout type
Cube layouts and triple stacks often require more precise depth and alignment to maintain clean horizontal and vertical lines.
Electrical and Ventilation Planning
-
Position electrical connections strategically
Junction boxes should be placed so they do not block installation. In many cases, routing power through an adjacent cabinet allows for a cleaner, flush finish. -
Plan for multiple connections when needed
Separate appliance stacks and cube layouts typically require individual electrical connections for each unit, while all-in-one units may use a single power source. -
Ensure proper airflow and heat management
All configurations require adequate ventilation gaps. This is especially important in tightly grouped layouts like triple stacks and cube installations to prevent overheating. -
Protect cabinetry from heat and moisture
Steam ovens introduce humidity into the cabinet space, so surrounding materials must be resistant to heat and moisture exposure.
Steam Oven Placement Considerations
Steam ovens introduce additional planning requirements that apply across all configurations, from vertical stacks to cube layouts.
Proximity to Water Source
-
Convenience of refilling
Non-plumbed models should be placed near a sink for easy access to water. -
Improved workflow
Positioning near a sink also creates a practical zone for handling hot trays and cookware.
Plumbed vs. Non-Plumbed Options
-
Plumbed models
These connect directly to a water line for maximum convenience but require planning for plumbing access and may impact cabinet depth or adjacent cabinetry. -
Non-plumbed models
These rely on a refillable water tank, making placement more dependent on proximity to a sink.
Impact on Configuration and Placement
-
Steam and heat management
Some manufacturers restrict placing other appliances above a steam oven. Always verify brand-specific guidelines before finalizing layout. -
Cabinet protection
Surrounding materials should be moisture-resistant to prevent long-term damage from steam exposure. -
Ventilation behavior
Steam and heat are vented differently depending on the appliance, so spacing and placement must allow for proper airflow in any configuration.
Specialized Functions: Proofing
Steam ovens are ideal for tasks like bread making and dough proofing. In setups that include a warming drawer, this function can be complemented with a dedicated proofing mode, creating a more complete baking system.
All-in-One Units vs Separate Appliance Stacks vs Triple Stacks vs Cube
All-in-One Units (Combination Sets)
All-in-one units are factory-designed combinations such as Bosch 30-inch combination ovens built to function as a single integrated appliance.
- Simplified Installation: These units require only a single cabinet cutout, making them easier to plan and install compared to stacking separate appliances.
- Unified Controls: Most models feature a single control panel that operates multiple ovens, creating a cleaner and more cohesive user experience.
- Streamlined Design: Because the components are pre-matched, alignment, handle styles, and finishes are consistent, resulting in a seamless, built-in look.
- System Limitations: Since the configuration is fixed by the manufacturer, you have less flexibility in choosing specific appliance types or brands.

Image Credit: Bosch
Separate Appliance Stacks
This approach involves stacking independent appliances, such as a wall oven paired with a steam or speed oven, within the same vertical cabinet.
- Performance Flexibility: You can select the best appliance for each function, mixing brands and technologies to create a truly customized cooking setup.
- Long-Term Adaptability: Individual units can be replaced or upgraded over time without affecting the rest of the stack.
- Custom Ergonomics: Separate cutouts allow you to fine-tune the height of each appliance based on your cooking habits and comfort.
- Installation Complexity: This setup requires more precise planning, including multiple cutouts, dedicated support structures, and separate electrical connections.
- Design Coordination: Mixing brands increases the need for careful alignment of finishes, handles, and display styles to maintain a cohesive appearance.
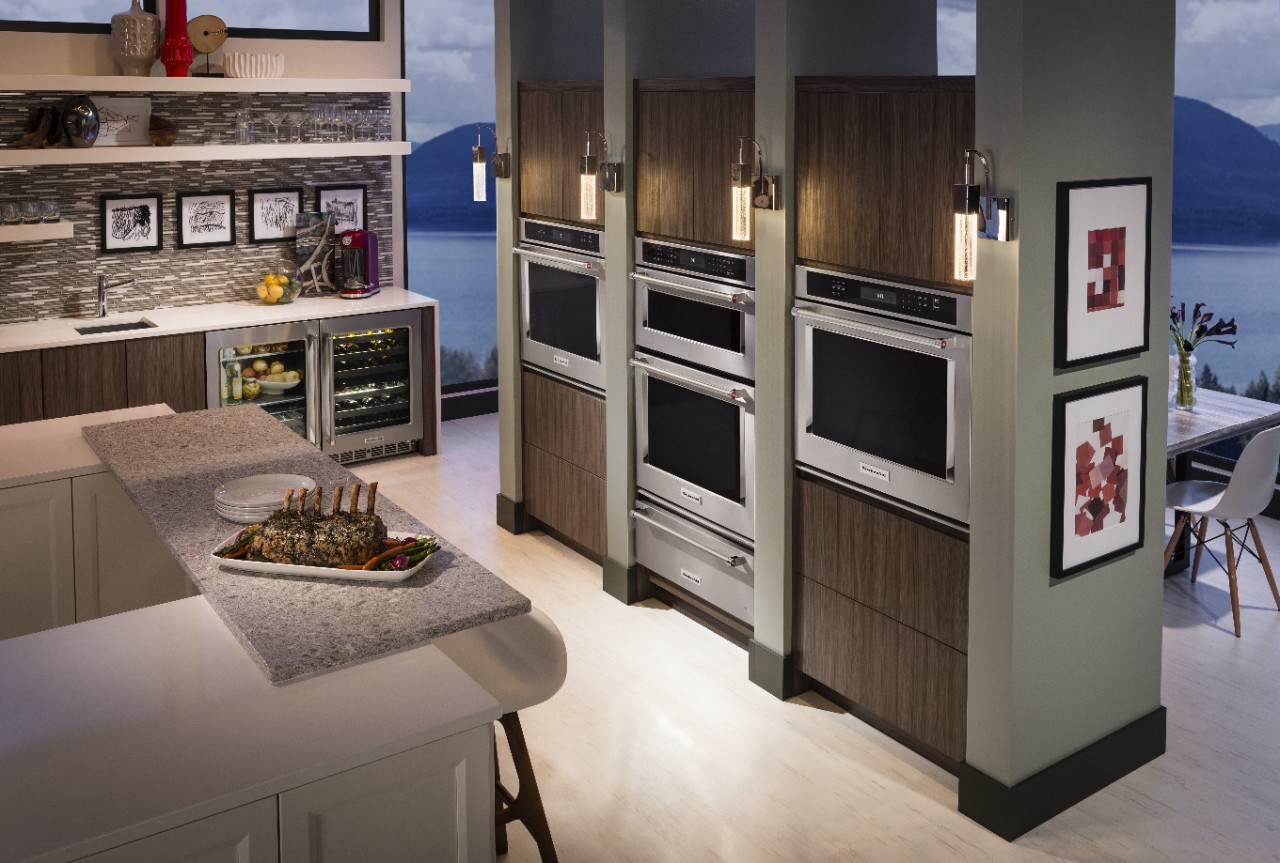
Image Credit: KitchenAid
Triple Stacks
A triple stack is a vertical arrangement of three units, typically a speed or steam oven at the top, a standard convection oven in the middle, and a warming or vacuum drawer at the base.
- Design Considerations: Brands like Thermador provide planning guides for 30” triple stacks in professional, contemporary, or minimal styles.
- Ergonomic Limits: Vertically stacking three ovens can be "too high" for safety. The top of the highest unit should ideally sit between 59" and 63". If the top of the stack exceeds 66", it becomes difficult to reach inside safely, potentially placing hot steam and liquids at eye level.
- Support: These stacks concentrate massive weight (up to 429 lbs); cabinets must be reinforced with 2x4 supports to ensure the base is secure and level.

Image Credit: Thermador
Cube (Bank) Installation
A cube layout arranges appliances in a grid or bank (e.g., a 2x2 grid) rather than a single vertical column.
- Ergonomic Benefits: This layout creates a centralized cooking hub where all appliances are kept at a convenient waist-to-shoulder height. It prevents the dangerous "overhead reaching" common in triple vertical stacks.
- Versatility: You can combine a full-sized convection oven with reduced-height steam or microwave ovens, a built-in coffee machine, and warming drawers below.
- Aesthetics: Achieving a professional look in a cube requires perfect horizontal and vertical alignment. For a seamless flush integration, appliances must be measured precisely to include their frames.

Image Credit: Gaggenau
Common Mistakes to Avoid When Stacking Ovens
Use this quick checklist to make sure your vertical oven stack is planned correctly:
- Avoid placing heavy ovens too high
- Match finishes and design elements
- Confirm cabinet load capacity
- Plan electrical locations in advance
Final Tips for Planning an Oven Configuration
Designing the right oven setup is all about balancing everyday usability, long-term safety, and a cohesive visual design. Whether you choose an all-in-one unit, a separate appliance stack, a triple vertical stack, or a cube-style layout, the most successful kitchens are planned early alongside cabinetry to ensure proper fit, structural support, and seamless installation.
Each configuration offers different advantages. Combination units simplify installation, separate stacks maximize flexibility, triple stacks optimize vertical space, and cube layouts improve accessibility. The key is selecting the approach that best fits your cooking habits, kitchen layout, and long-term needs.
Just as important, think beyond the initial install. Choosing appliances that can be easily serviced or upgraded over time will make your kitchen more adaptable and cost-effective in the future.
If you are ready to build your ideal oven stack, explore our curated selection of steam ovens, speed ovens, and wall ovens to find models at Shop Appliances that are designed to work seamlessly together.
FAQs
What is the best order for stacking steam, speed, and wall ovens?
The most recommended configuration is placing the steam or speed oven at the top, the main wall oven in the middle, and a warming drawer at the bottom. This setup improves ergonomics, safety, and ease of use.
What is the difference between a triple oven stack and a cube oven layout?
A triple oven stack arranges appliances vertically in a single column, maximizing vertical space. A cube layout, on the other hand, organizes appliances in a grid (such as a 2 by 2 layout), keeping all units within a more accessible waist-to-shoulder height range.
Are cube oven layouts more ergonomic than vertical stacks?
Yes, cube layouts are generally more ergonomic because they reduce the need to reach above shoulder height. By keeping appliances within a comfortable range, they make it easier and safer to access hot dishes and controls.
How high should a wall oven be installed in a stack?
The center of the wall oven should ideally sit around waist level. This allows for safer handling of heavy cookware and more comfortable loading and unloading.
Do stacked ovens require special cabinet support?
Yes. Each appliance must sit on its own dedicated, load-bearing platform. Standard cabinet shelves are not sufficient to support the combined weight of stacked ovens.
What cabinet depth is needed for a vertical oven stack?
A minimum depth of around 23 inches is typically recommended, though deeper cabinets may be required for flush installations or to accommodate wiring and ventilation.
Can you mix different appliance brands in a vertical stack?
Yes, but it requires careful planning. Differences in stainless steel tone, handle design, and display lighting can create a mismatched look if not coordinated properly.
Do steam ovens need to be near a sink?
It is highly recommended, especially for non-plumbed models that require manual refilling. Plumbed steam ovens also need access to a water line, which impacts placement.
Is it better to buy a combination unit or separate ovens?
Combination units offer a simpler installation and unified design, while separate units provide more flexibility, better performance customization, and easier long-term replacement.
What are the biggest mistakes when installing a vertical oven stack?
Common mistakes include placing heavy ovens too high, failing to reinforce cabinetry, poor electrical planning, and mixing mismatched finishes.
Read More
Panel Ready vs Stainless Steel Which Fits Your Kitchen Design
Design Trends: Comparing 1950s Pastel Appliances to Modern Stainless Steel
How to Pair Luxury Refrigeration with Custom Cabinetry (Complete 2026 Design Guide)
Best Kitchen Appliance Packages for Open Concept Layouts in 2026
Ultimate Guide to Customizable Home Appliances: Handles, Trim, Finishes, and Panel Styles Explained