How to Clean Refrigerator Coils to Lower Energy Bills and Boost Efficiency

Introduction
Your refrigerator works all day, every day to keep food fresh, drinks cold, and frozen items safely stored. But one of the most important parts of that cooling process is also one of the easiest to overlook: the condenser coils.
Refrigerator coils help release heat from the appliance so it can maintain a steady internal temperature. When those coils are clean, heat can escape properly and the refrigerator can run more efficiently. When they are covered in dust, lint, pet hair, or grime, that buildup acts like an insulating layer that traps heat around the coils.
As a result, the compressor has to work harder and run longer to keep the refrigerator cold. Over time, this can lead to higher energy bills, inconsistent cooling, louder operation, and extra wear on the appliance. In severe cases, neglected coils may even contribute to overheating or costly repairs.
The good news is that cleaning refrigerator coils is a simple maintenance task most homeowners can handle with a coil brush, a vacuum, and a little time. In this guide, you will learn why coil maintenance matters, how often to clean your refrigerator coils, what warning signs to watch for, and how to clean them safely step by step.
Quick Answer: How Often Should You Clean Refrigerator Coils?
Most homeowners should clean refrigerator coils at least twice a year. If you have pets, live in a dusty home, or own an older refrigerator, check the coils every 2 to 3 months and clean them every 3 to 6 months as needed.
Clean coils help your refrigerator release heat more efficiently, which can reduce compressor strain, support better cooling performance, and help prevent unnecessary energy waste.
What Do Refrigerator Coils Do?
Condenser coils are the "behind-the-scenes heroes" of your refrigerator's cooling system, serving as a critical radiator for the appliance. Their primary job is to facilitate the heat exchange process necessary to keep your food at the correct temperature.
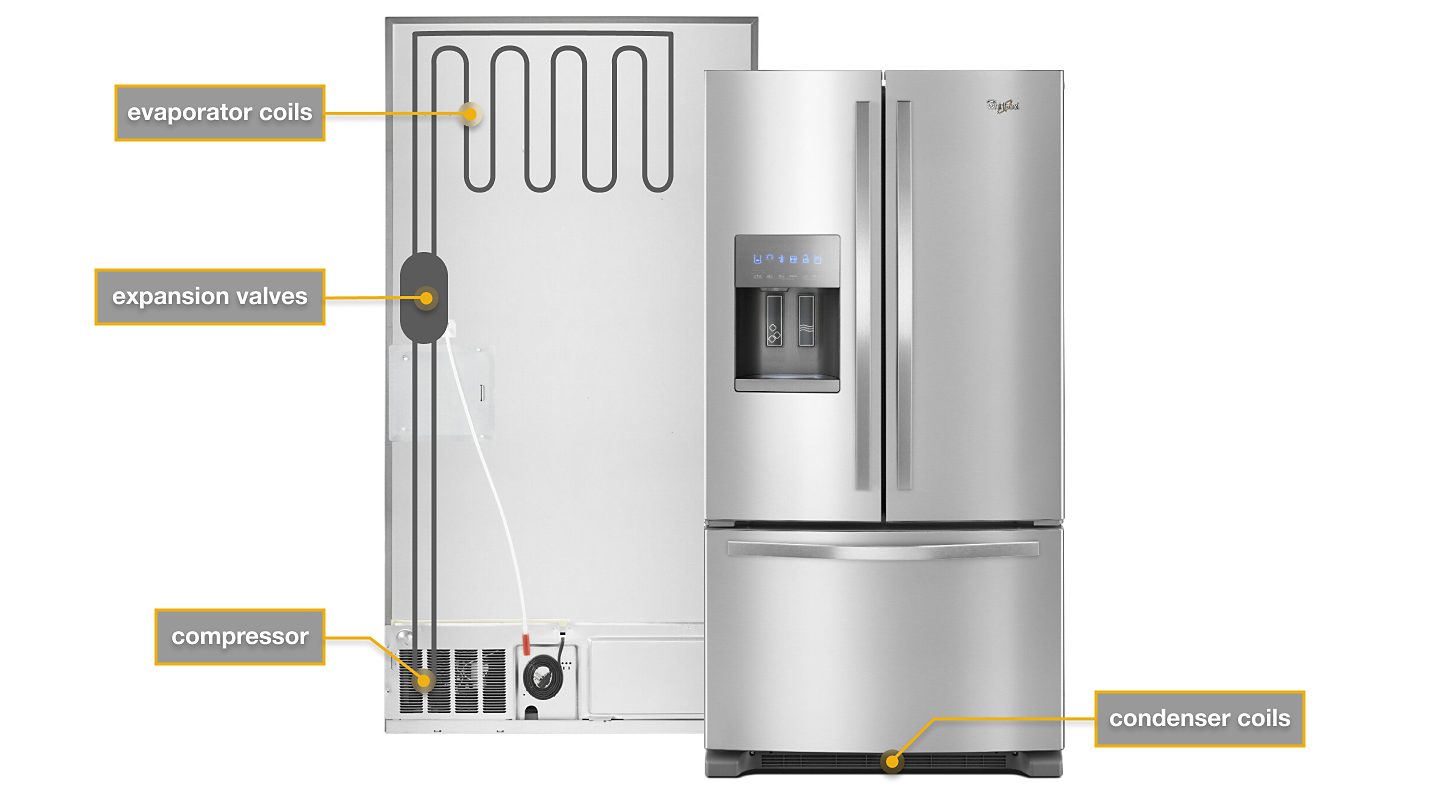
Image Credit: Whirlpool
Releasing Heat from the Inside
The cooling process begins when the refrigerator absorbs heat from the food and air inside the unit. The condenser coils then take this extracted heat and release it into the air outside the refrigerator.
Efficiency of Clean Coils
When coils are clean, heat can dissipate quickly and effortlessly into the surrounding room. This unrestricted airflow allows the refrigerator to operate at peak efficiency, maintaining consistent internal temperatures without straining the cooling components.
The Danger of "Dust Blankets"
Because coils are often located near the floor, they easily collect dust, pet hair, and grime. Over time, this buildup creates an insulating "dust sweater" or "lint blanket" around the coils. This layer acts as a barrier that traps heat inside the coils, preventing it from escaping.
Increased Compressor Strain
When heat is trapped, your refrigerator’s compressor is forced to compensate by running much longer and working significantly harder to maintain the set temperature. This constant "overtime" work not only spikes your monthly energy bill but also increases the risk of the compressor overheating or failing prematurely.
How Dirty Coils Affect Your Monthly Energy Bill
Your refrigerator is one of the most significant energy consumers in your home, and its efficiency depends heavily on the condition of its condenser coils. When these coils are neglected, the financial impact quickly shows up on your monthly utility statement.

Image Credit: KitchenAid
The Problem: Restricted Airflow
Because condenser coils are often located near the floor or at the back of the unit, they easily collect dust, pet hair, and grime. This accumulation creates a barrier that restricts essential airflow. Dirty coils can act like a “dust sweater” around the refrigerator, trapping heat instead of letting the appliance release it into the surrounding air.
The Chain Reaction: Compressor Strain and Energy Spikes
When heat cannot escape efficiently, a costly chain reaction begins:
- Harder and Longer Run Times: To compensate for the trapped heat, the compressor must work significantly harder and run for much longer intervals to maintain a safe internal temperature.
- Increased Electricity Consumption: Because the compressor is a major power drain, these extended cycles lead to a direct and measurable increase in electricity use.
- Financial Red Flags: A sudden, unexplained increase in your power bill is often a primary warning sign that your coils are clogged and your appliance is struggling to function.
The Solution: Restoring Efficiency
The good news is that cleaning your coils can provide instant relief for your wallet. Experts estimate that cleaning dirty coils can improve efficiency and reduce energy consumption by as much as 35%. While the impact varies by model, research shows that refrigerators with bottom-mounted coils that have become visibly "plugged" with debris see the most marked decreases in energy use once they are professionally cleaned or vacuumed.
Regularly removing this "lint blanket" is a simple maintenance step that ensures you aren't overpaying for basic refrigeration.
Warning Signs Your Refrigerator Coils Need Cleaning
Recognizing the early warning signs of dirty condenser coils can save you from high energy bills and expensive compressor repairs. Use this checklist to identify performance issues before they lead to a total appliance breakdown.
Your Refrigerator Runs Constantly
If you notice your refrigerator cycling more frequently or running without stopping, it is likely struggling to maintain its internal temperature. When coils are covered in a "dust sweater," they cannot release heat efficiently, forcing the compressor to work overtime.
Food Is Not Staying Cold Enough
Inadequate cooling is a major red flag that airflow is restricted. You may notice food spoiling faster than usual, or a freezer that fails to reach its normal operating temperature. If left uncleaned, the coils can become so plugged that the refrigerator stops cooling entirely.
The Back or Bottom of the Refrigerator Feels Hot
Because condenser coils act as a radiator to dissipate heat, any buildup of grime acts as an insulator. This causes excess heat to stay trapped around the appliance, making the back panel, the bottom grille, or the compressor itself feel unusually hot to the touch.
You Hear Buzzing, Clicking, or Unusual Noises
A compressor that is forced to work against the heat of dirty coils will often let you know with strange sounds. Listen for persistent buzzing, clicking, or other odd noises, which indicate the cooling system is under significant mechanical strain.
Your Energy Bill Suddenly Increases
A sudden, unexplained spike in your monthly utility costs is a common sign of efficiency loss. Since the compressor is one of the largest power consumers in your home, its extended run times due to dirty coils can increase energy usage by as much as 35%.
You See Dust, Lint, or Pet Hair Around the Coils
Sometimes the clearest sign is a simple visual inspection. Check the coils behind the back panel or under the front kickplate; if you see a thick "lint blanket" or "dust snuggy" of pet hair and grime, your refrigerator is long overdue for a cleaning.

Image Credit: Samsung
How Often Should You Clean Refrigerator Coils?
To maintain peak efficiency and protect your appliance, a general rule of thumb is to clean your refrigerator condenser coils at least twice a year. Regular maintenance prevents the heavy accumulation of grime that leads to higher energy costs and mechanical failure.
Factors Requiring More Frequent Cleaning
Depending on your household environment, you may need to clean your coils more often:
- Pet Owners: If you have cats or dogs, pet hair can quickly create a "filter" that traps additional dust. Experts recommend cleaning every 3 to 6 months for homes with pets.
- Dusty Environments or Renovations: In homes that are naturally dusty or currently undergoing construction, quarterly cleaning is highly effective at maintaining optimal airflow.
- Older Refrigerators: While some modern designs are more resistant to buildup, older models often require more frequent maintenance to ensure the cooling system stays functional.
Expert Maintenance Tip
A smart habit for any homeowner is to perform a visual inspection every 2 to 3 months. If you notice a visible layer of lint, hair, or debris, it is time for a cleaning, regardless of when you last performed the task.
Note: Scheduling a yearly deep clean right before summer is an excellent strategy to help your refrigerator handle warmer seasonal temperatures while lowering your power bill.
Tools You Need to Clean Refrigerator Coils
Maintaining your refrigerator’s efficiency is a straightforward task when you have the right tools prepared. Using these simple household items will help you remove the "dust sweater" from your coils and protect your appliance from overheating.
- Refrigerator Coil Brush: This specialty tool is designed to loosen stubborn, stuck-on dust and pet hair that a vacuum might miss. A long-handled conical brush is standard, but many experts suggest a bendable dryer vent brush to reach into tight nooks and crannies.
- Vacuum with Hose Attachment: Use a vacuum with a brush or crevice tool to suck away loosened debris. While a standard household vacuum works, a shop vac is often recommended for its superior suction power.
- Soft Cloth or Microfiber Towel: Microfiber is ideal for lifting and pulling dust off the surface of the coils. For caked-on grime, a damp cloth or sponge can be used to wipe the coils clean.
- Flashlight: Because coils are typically tucked away in dark areas underneath or behind the refrigerator, a flashlight is essential for a proper visual inspection to ensure all debris is removed.
- Gloves: While optional, wearing safety gloves protects your skin from dust and potentially sharp edges around the condenser and internal components.
- Screwdriver: Depending on your model, you may need a Phillips or flathead screwdriver to remove the screws securing the front kickplate or the back access panel.
How to Clean Refrigerator Coils Safely
Maintaining your refrigerator's condenser coils is one of the most effective ways to ensure appliance longevity and energy efficiency. Follow this expert-led, step-by-step guide to perform this essential maintenance safely and effectively.
Step 1: Unplug the Refrigerator
Safety is the absolute priority when performing any appliance maintenance. Always disconnect the power cord from the wall outlet before starting to avoid any risk of electric shock or injury from moving parts, like the condenser fan. As long as you keep the doors closed, your food will remain safely cold for up to four hours while you work.
Step 2: Locate the Coils
Depending on your model, the condenser coils are typically found in one of three places: behind the unit, underneath the unit behind a front grille (kickplate), or across the entire back panel. On newer models, they are most frequently located at the front bottom. Consult your owner's manual if you are unsure where yours are situated.

Condenser Coil
Image Credit: Whirlpool

Evaporator Coil
Image Credit: Whirlpool
Step 3: Move the Refrigerator Carefully
If your coils are located at the rear, you will need to slowly pull the refrigerator away from the wall to gain access. Most refrigerators are equipped with wheels to make this easier, but you should use a towel or plastic sliders to protect your flooring from scratches. Be extremely careful not to kink or damage the power cable or water lines, as this can lead to leaks or electrical issues.
Step 4: Remove the Grille or Access Panel
To reach the coils, you may need to remove a protective cover. Front-mounted grilles often snap off or are held by a few screws. Rear panels are usually made of metal or cardboard and are secured with screws; using a flathead or Phillips screwdriver will typically do the trick. Pro tip: Keep your screws in a safe place so they aren't lost during the cleaning process.
Step 5: Brush Away Dust and Debris
Using a dedicated refrigerator coil brush or a bendable dryer vent brush, gently loosen the "dust sweater" of lint and pet hair from the coils. Avoid using aggressive scrubbing motions; instead, apply light pressure as you pull the brush toward you to avoid bending or damaging the delicate coil structures.
Step 6: Vacuum the Area
Once the dust is loosened, use a vacuum with a hose or crevice attachment to suck up the debris. A shop vac is particularly effective here due to its higher suction power. Be sure to vacuum not only the coils themselves but also the surrounding floor, the internal fan area, and the front grille to prevent dust from immediately being sucked back into the system.
Step 7: Wipe Down the Exterior Area
For stubborn, caked-on grime that the vacuum might miss, use a damp cloth, sponge, or microfiber towel to wipe the coils and surrounding surfaces clean. Microfiber is especially useful as it is designed to lift and pull dust away from surfaces. You should also take a moment to wash the removed grille or panel with soap and water before reattaching it.
Step 8: Reassemble and Plug the Refrigerator Back In
Once the area is clean and dry, replace the access panel or front grille and secure any screws. Carefully push the refrigerator back into its original position, ensuring there is at least two to three inches of space from the wall for proper ventilation. Finally, restore power by plugging the unit back into the wall.
Step 9: Monitor Performance
After cleaning, keep an eye on your refrigerator's behavior over the next 24 hours. You should notice a decrease in compressor cycle frequency and an overall quieter, smoother operation. If you previously experienced cooling issues, check to ensure the unit is now maintaining consistent internal temperatures.
Video Credit: Whirlpool
Safety Tips Before Cleaning Refrigerator Coils
Cleaning your condenser coils is a simple DIY task, but safety should always be your top priority. Following these expert-approved precautions will help protect both you and your appliance during the process.
Always Unplug the Appliance First
Before you begin any maintenance, disconnect the power cord from the wall outlet. This is a critical step to prevent electric shock and to avoid injury from moving parts, such as the condenser fan. As long as the doors remain closed, your food will stay safely cold for up to four hours while you work.
Avoid Bending or Damaging the Coils
Condenser coils are delicate metal lines that can be easily compromised. When using a brush or vacuum, apply gentle pressure and avoid aggressive scrubbing that could bend the lines or break fan blades. Damaging these lines can lead to refrigerant leaks, which often require professional repair.
Do Not Use Sharp Tools
Never attempt to scrape away stubborn debris with knives, screwdrivers, or other sharp objects. Stick to approved tools like a long-handled coil brush, a dryer vent brush, or a vacuum with a soft brush attachment to safely loosen "caked-on" grime.
Be Careful Around Water Lines and Power Cords
If your model requires you to pull the unit away from the wall, do so slowly and carefully. Ensure you do not kink, stretch, or crush the power cable or the water line for your ice maker, as this can lead to electrical shorts or water damage in your kitchen.
Wear Protective Gear
While optional, wearing safety gloves is highly recommended. The coil area can accumulate significant amounts of irritating dust and pet hair, and the internal components may have sharp metal edges that can cause small cuts.
Common Mistakes to Avoid
Proper refrigerator maintenance is simple, but a few common errors can lead to accidental damage or reduced efficiency. Avoid these mistakes to ensure your appliance stays in top working condition.
Cleaning While the Refrigerator Is Plugged In
Safety is the most critical step in any DIY maintenance. Never attempt to clean your coils while the unit is connected to power. Unplugging the refrigerator prevents electric shock and protects you from moving parts, such as the condenser fan.
Using Too Much Force on the Coils
Condenser coils are made of delicate metal lines that can easily bend or break if handled roughly. Avoid aggressive scrubbing or using sharp tools like screwdrivers to scrape away debris. Instead, use a soft coil brush or a vacuum with a gentle brush attachment to lift away the "dust sweater" without causing refrigerant leaks.
Forgetting to Clean the Grille or Floor Area
Cleaning the coils themselves is only half the job. Dust, lint, and pet hair often accumulate on the front grille, back panel, and the floor surrounding the unit. If you don't vacuum these areas, the fan will quickly suck that debris back onto your freshly cleaned coils, undoing your hard work.
Ignoring Pet Hair Buildup
Pet owners need to be especially vigilant. Pet hair acts as a high-density "filter" that traps dust much faster than standard household lint. If you have cats or dogs, waiting the standard six months may be too long; check your coils every three months to prevent a thick "lint blanket" from choking your compressor.
Waiting Until the Refrigerator Stops Cooling
Many homeowners only think about coil maintenance after they hear strange buzzing noises or notice food thawing out. By the time your refrigerator stops cooling, the compressor has already been subjected to extreme heat and strain. Regular, preventive cleaning every six months helps avoid these "emergency" situations and extends the overall life of your fridge.
Assuming Coil Cleaning Will Fix Every Cooling Problem
While dirty coils are a common culprit for poor performance, they aren't the only possibility. If your refrigerator is still hot to the touch or failing to cool after a thorough cleaning, you may have deeper mechanical issues like low refrigerant levels, a faulty thermostat, or a broken condenser fan motor. In these cases, it is best to contact a qualified technician for a professional diagnosis.
Can Cleaning Refrigerator Coils Really Lower Energy Use?
Even when the change on your utility bill is small, regular coil cleaning still helps protect the long term performance of your appliance. By reducing heat buildup and compressor strain, this simple task can help your refrigerator cool more consistently and may reduce the risk of premature repairs.
However, if your current refrigerator is older, inefficient, or still struggling after basic maintenance, it may be time to compare newer ENERGY STAR rated models. ENERGY STAR certified refrigerators are designed to use less energy while still delivering reliable cooling performance, making them a smart upgrade for households looking to improve efficiency beyond routine maintenance.
Below are a few energy efficient refrigerator options to consider:

GE 24.7 cu. ft. French Door Refrigerator GNE25JYKFS | Shop Appliances
Image Credit: Shop Appliances

Whirlpool 19 cu. ft. Bottom Freezer Refrigerator WRB329DMBM | Shop Appliances
Image Credit: Shop Appliances

LG 20.8 cu. ft. French Door Refrigerator LF21G6200S | Shop Appliances
Image Credit: Shop Appliances

Samsung 17.5 cu. ft. French Door Refrigerator RF18A5101SR | Shop Appliances
Image Credit: Shop Appliances
Final Thoughts
Cleaning refrigerator coils is one of the simplest ways to help your fridge run more efficiently. When dust, pet hair, and lint build up around the coils, the refrigerator has a harder time releasing heat. That extra strain can lead to longer run times, higher energy use, uneven cooling, and unnecessary wear on the compressor.
By cleaning the coils every six months, or more often in homes with pets or heavy dust, you can help maintain steady cooling performance and extend the life of your appliance. It is a small maintenance task, but it can make a noticeable difference in how smoothly your refrigerator operates.
If your refrigerator is still struggling to cool properly after cleaning the coils, it may be time to consider a replacement. At ShopAppliances.com, you can explore a wide selection of reliable, energy efficient refrigerators from trusted brands and find the right model for your kitchen, lifestyle, and budget.
FAQs
How often should I clean my refrigerator coils?
Most homeowners should clean refrigerator coils at least twice a year. Homes with pets, heavy dust, or older refrigerators may need cleaning every 3 to 6 months.
What happens if refrigerator coils are dirty?
Dirty coils trap heat and restrict airflow, which forces the compressor to work harder. This can lead to higher energy use, poor cooling, overheating, and extra wear on the appliance.
Can dirty refrigerator coils increase my electric bill?
Yes. Dirty coils can cause the refrigerator to run longer and use more electricity, especially if the coils are heavily clogged with dust or pet hair.
Where are refrigerator coils located?
Refrigerator coils are usually located either behind the refrigerator or underneath the unit behind the front grille. The exact location depends on the model.
Do I need a professional to clean refrigerator coils?
Most homeowners can clean refrigerator coils with a coil brush and vacuum. However, you should contact a technician if cleaning the coils does not fix cooling problems, overheating, or unusual compressor noises.
Read More
How to Replace Filters and Understand Filter Alerts for HVAC, Air Purifiers & Refrigerators
How to Maintain Dishwasher Filters and Spray Arms
How to Prevent Odor, Moisture, and Mold in Refrigeration Systems
The Ultimate Guide to Induction Cooktop Care: Cleaning, Repair, and Longevity